Monday, March 30, 2015

Chicken and Cheddar Biscuit Casserole

Day 98

Today’s recipe is perfect for company. The filling is much like that of a potpie while the topper for each serving is a cheddar garlic drop biscuit instead of a pastry crust. You really need nothing more than some sliced tomatoes or green peas on the side of this casserole to make it a complete, balanced meal.

Photo by Maggie Kapustin
 
With warm weather’s delayed arrival this year, I’m spending lots of time on rich, comfort food recipes.  Soon enough, when the temperatures rise, we will be looking for lighter fare. For now, though, I’m thrilled to have some more time to enjoy some typically cooler weather dinners. I hope you’ll have time to make this before you put away those boots and sweaters and open your windows for spring!

Chicken and Cheddar Biscuit Casserole
Ingredients: 

3 tbs. butter
1 cup diced carrots
1 large onion, chopped
16 oz. mushrooms (any of your favorites) 
3 cloves garlic, minced
½ cup dry white wine
1/3 cup all purpose flour
1- 32oz.box chicken broth 
¾ cup heavy whipping cream
¼ cup chopped chives
3 tbs. chopped parsley
2 tsp. chopped rosemary
8 cups shredded, cooked chicken
salt and pepper to taste

2 cups Jiffy biscuit mix
1cup cheddar cheese
garlic powder
2/3 cup buttermilk 

Directions
Preheat oven to 400 degrees. Melt 3 tbs. butter in Dutch oven over medium-high heat. Add carrots and onion, and sauté five minutes. Add mushrooms and sauté an additional five minutes. Stir in garlic; sauté two minutes. Sprinkle with 1/3 cup all purpose flour and cook, stirring constantly for three minutes. Slowly add broth, stirring constantly; bring mixture to a boil and continue stirring 2 minutes or until thickened. Stir in cream, chives, parsley, and rosemary. Add cooked chicken and season to taste with salt and pepper.

Transfer to a 9x13 greased baking dish. Combine Jiffy mix, cheese, and buttermilk until a sticky dough forms. Drop on top of casserole to make 6-8 biscuits dollops. Bake at 400 degrees for about 20-25 minutes or until biscuits are done and casserole is bubbly. Check biscuits frequently for doneness to make sure you aren’t over –baking them. 


Modified recipe from the original Chicken and Biscuit Cobbler found in the December 2014 Southern Living magazine and at the following web link: http://www.myrecipes.com/recipe/chicken-biscuit-cobbler
Monday, March 23, 2015

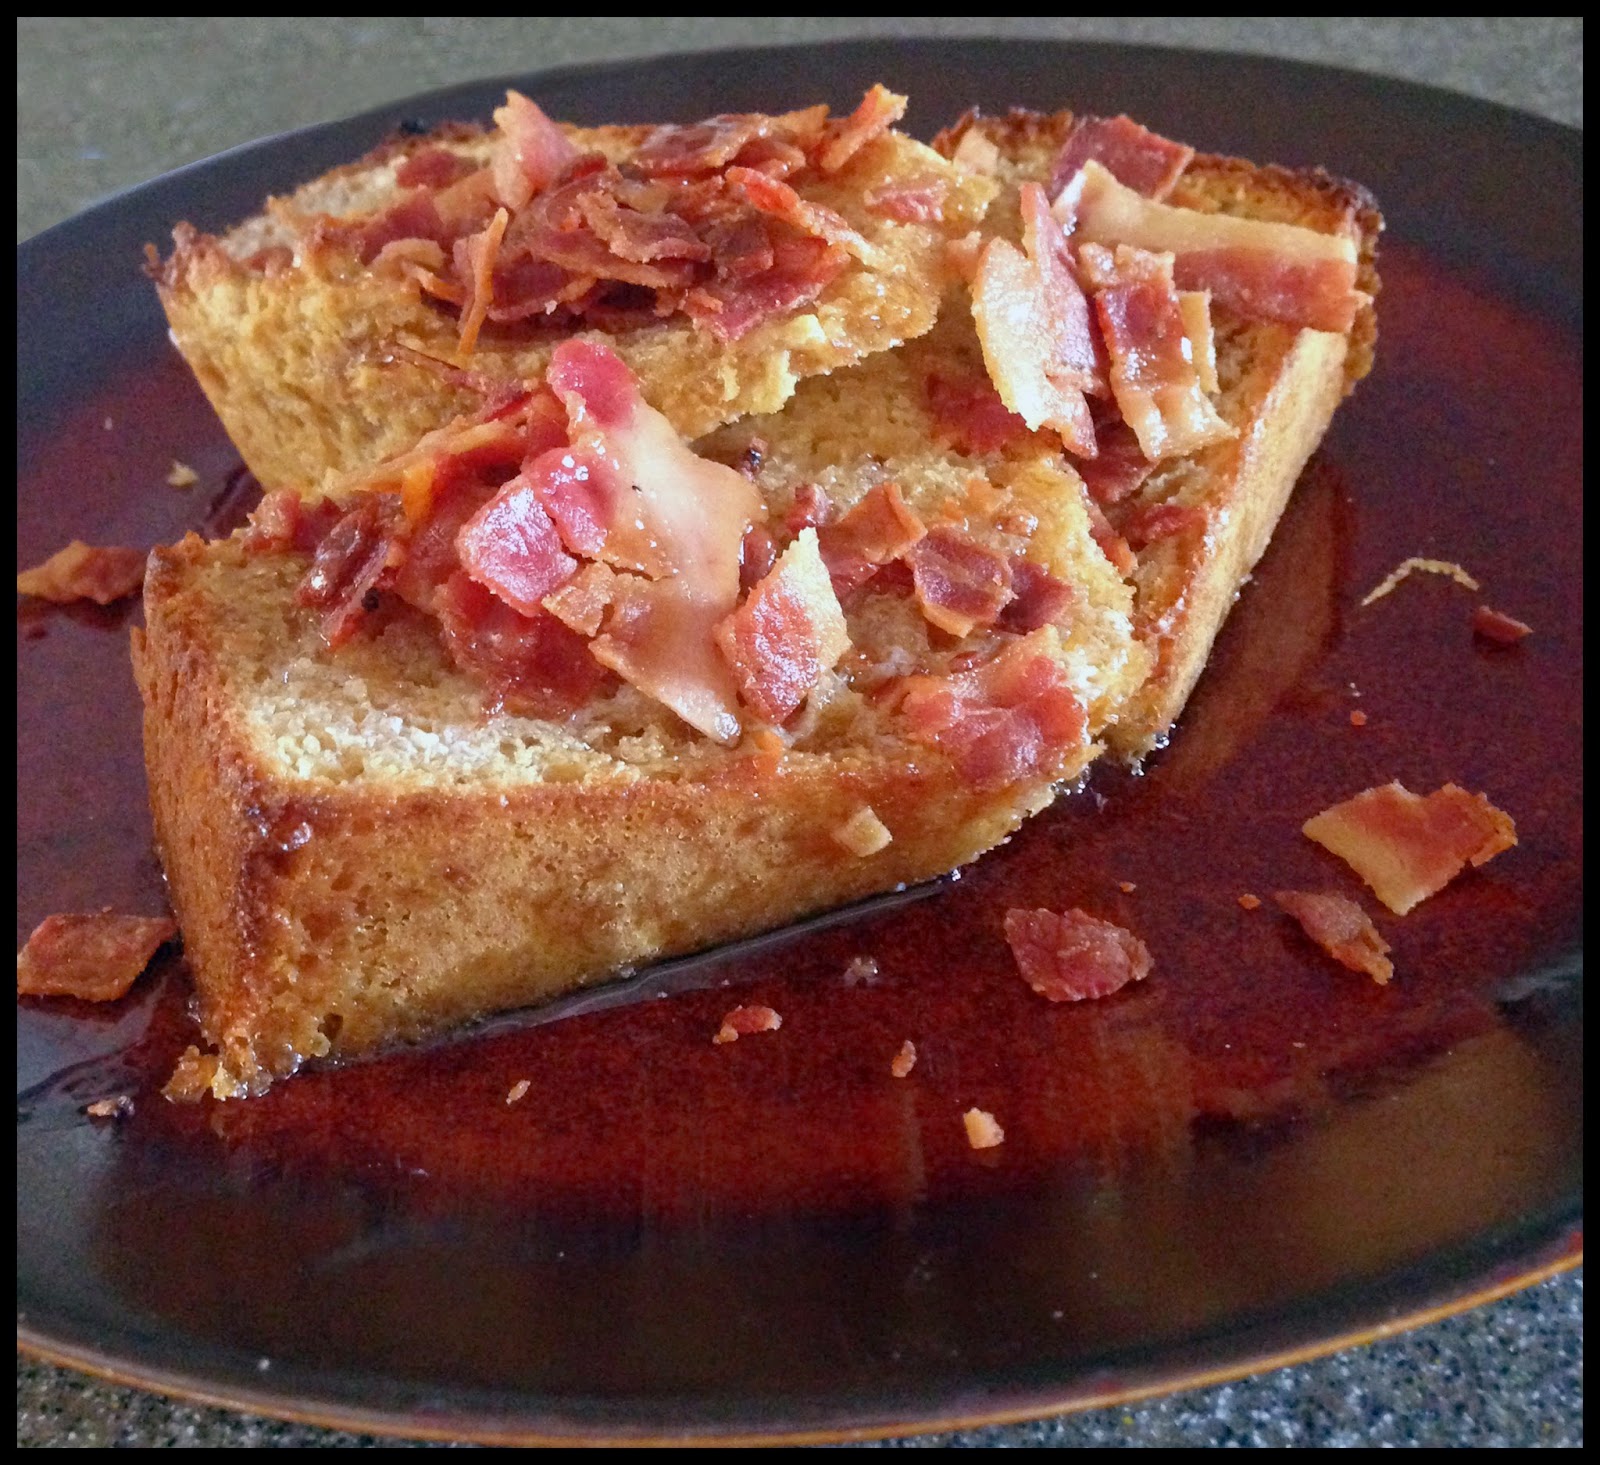
Maple Bacon “Breakfast”

Day 97

If you like the flavors of bacon, butter, and maple together, this recipe is for you.  And furthermore, if you enjoy the texture of cake or breakfast breads with these aforementioned flavors, this recipe is really, really, really for you.
Photo by Maggie Kapustin
 
Just trust me on this one. Embrace how easy it is. Celebrate its uniqueness. Indulge yourself and your loved ones with this over Easter break. You. Will. Not. Regret. It. 

Oh, a little advice: do make the “bread” the night before, to save yourself unnecessary last minute morning work.

Maple Bacon “Breakfast”
Ingredients: 

For the breakfast bread-
1 box/package butter recipe yellow cake mix
8 oz. cream cheese, softened to room temperature
4 large eggs at room temperature
½ cup buttermilk
½ cup sugar
½ cup canola oil
1 tsp. vanilla extract
2 tsp. maple flavoring/extract

The rest- 
15 slices bacon, fried, drained, and crumbled 
1 stick butter 
Maple syrup

Directions: 
Preheat oven to 350 degrees. Grease and flour Bundt pan. 

Beat cream cheese and sugar with electric mixer until smooth. Add buttermilk, oil, and eggs. Blend.  Add cake mix and beat on medium speed until well incorporated. Add extracts and blend for about 20 seconds more. 

Pour into Bundt pan and bake for 35-40 minutes or until knife in center comes out clean. Cool completely on a wire rack. Do not slice yet. Store in airtight container overnight. 

When ready to serve for breakfast, line a baking sheet with foil and turn broiler on high heat with a rack placed about 10 inches from the heating element. Heat maple syrup on low heat or microwave to warm. 

Slice breakfast bread and place on foil lined baking sheet. Generously spread butter on each slice and place under broiler until the tops and edges are nicely browned a slightly crisp. Remove from oven immediately. Add maple syrup. Sprinkle bacon crumbles over the top and serve immediately. 

Saturday, March 21, 2015

Garlic Soup

Day 96

All that talk about Julia Child in my last entry is to blame. That’s what made me want to read her recipe for garlic soup and to begin searching for others so that I could make something of my own. Next, of course, I’ll try hers and compare. 

I already know the winner; no one can top a Julia Child recipe, and why would we want to?  So, this one’s for you, Julia Child; I hope you’d approve. I so wish I could have known you and could have had the privilege of working under your inspiring tutelage and in your belle cuisine, parfaitement équipée.  Merci Madame Julia!
Copyright, Doug Kapustin Photography, 2015
 

Bon Appétit! 

Important notes: 
--If you happen to have a food processor, it will make the potato and carrot prep much faster. If not, a box grater will work.

--Because this recipe requires 40 peeled cloves of garlic, you might want to buy pre-peeled cloves. The flavor is still good since they will be roasted prior to use. Brands like Spice World offer containers or bags of peeled whole cloves in most grocery stores. Otherwise, you will want to prep the garlic peeling before you get started with the recipe since it will take a bit of time. 

--Pancetta— which is an Italian round cut pork, similar to bacon— can be replaced with bacon if it isn’t available in your market. 

--I chose potatoes, carrots, and pancetta as additions to create a heartier garlic soup. 

Garlic Soup
Ingredients: 

40 cloves peeled garlic
4 oz. diced pancetta
2 yellow onions, diced
3 large Yukon Gold potatoes, peeled and shredded in food processor
3 medium carrots, shredded in food processor
4 cups chicken broth
¾ cup heavy cream
2 tbs. fresh thyme
sprig of rosemary
4 tbs. butter
2 tsp. olive oil plus more for roasting garlic
salt and pepper to season

Directions:
Make a basket with heavy-duty aluminum foil, and place garlic in the center. Drizzle with olive oil, add some salt and pepper, and place a whole rosemary sprig on top. Close the foil over the garlic to make a tent for roasting. Place in 375 degree oven for about 20 minutes. (You’ll be able to smell the roasted garlic when it’s close to ready—usually around 17-22 minutes for most ovens.)

Meanwhile, heat the butter and olive oil in a Dutch oven, and add onions and pancetta. Cook until pancetta begins to brown. Add carrots and potatoes and cook for 2 minutes more. Pour broth over vegetables. Season to taste with salt and pepper.

Once garlic is roasted, discard rosemary and chop garlic cloves coarsely. Add to Dutch oven. Allow to simmer until all ingredients are tender. Taste to check seasoning and add more salt and pepper if needed. 

Using a hand-held immersion or free-standing blender, blend soup until creamy and smooth. In Dutch oven, add heavy cream to blended soup, and stir. Add thyme. Simmer just until hot; don’t boil. 

Serve immediately with cheese toast or croutons and Parmesan cheese if desired. 

And one last thing: if you want to spend an enjoyable hour watching a tribute to Julia Child, made just before she passed away in 2004, check out this link. 


Thursday, March 19, 2015

Ambrosia Trifle

Day 95

I made these individual trifles in plastic disposable cups last weekend for our book club. They related a bit to the book we were discussing, Big Little Lies, by Liane Moriarty (a fun read!) since the main characters often enjoyed mimosas and muffins together.  

Trying to indulge the orange flavor and the airy texture in this trifle, I decided that something akin to ambrosia could work.
Photo by Maggie Kapustin

For those of you who might not be familiar with ambrosia, it’s that orange and marshmallow salad that we sometimes see at fall or winter parties, especially in the South. It’s not as popular as it used to be when I was a little girl, sadly. Maybe this recipe will give a revival to the concept of “ambrosia with an update.”

This dessert is a nice addition to your spring menu, for sure. The individual trifles  are also so quick and easy to make!


Ambrosia Trifle
Ingredients: 
1 box orange cake mix (and ingredients to make according to directions on box)
1 bag small marshmallows
2 cans mandarin oranges, drained (save juice)
1 cup candied walnut, almond, or pecan pieces
1 bag shredded, sweetened coconut
1 quart heavy cream
2 containers (8 oz. each) mascarpone cheese
2 tsp. vanilla
1 cup powdered sugar


Directions: 
Using mandarin orange juice to replace water (you’ll probably have to add some water to make the correct amount, though), make and bake orange cake in a 9x13 pan, according to package directions. Note: I used the cake mix by Duff for this one because I think it’s very good quality for a mix.  

Allow to cool.

Beat sugar, vanilla, and heavy cream in a mixer until soft peaks form, then add mascarpone cheese and beat until it forms a firm, peaked whipped cream consistency. Set aside.

Have all ingredients ready for stacking—cake, whipped cream, marshmallows, nuts, coconut, and oranges. 

Starting with cake and ending with coconut each time, crumble and layer in this order in each cup, making 8-12 cups total, depending on their size: 

Cake
Oranges
Coconut
Whipped cream
Marshmallows
Cake 
Nuts
Whipped cream
Coconut 


*You could also make one large trifle with this recipe if you prefer. 

Tuesday, March 17, 2015

Buttermilk and Brown Sugar Custard Pie

Day 94

There really are some desserts that needn’t be changed or adorned; they are delicious just as they are. Old-fashioned pies certainly qualify as a sort of simplistic perfection, and what better pie than an egg custard? It falls into the category of desserts that have survived, basically unchanged, for generations. My grandmother used to reminisce about her grandmother’s egg custards, and they probably didn’t even need measurements and directions to make their family recipe. I remember 
Photo by Maggie Kapustin
my grandmother sharing recipes with me that said to add a “pinch” of this or a “handful” of that. I never could get it quite right; their cooking was an art and an exercise in repetition—a tried and true means of perfecting each dish. 

Things changed a bit in the 1950s, from what I’ve learned. About then, the T.V. dinner came along and impacted American kitchens forever. I like to think, had I lived then, that I would have resisted the idea of frozen, processed dinners, but the truth is, I probably would have found them as exciting as everyone else. 

Also in the 1950s, in an attempt to bring America full circle again, the late, great, Julia Child brought a scientific approach back into the process of cooking. She was trying her best to help women remember the advantage of authentically delicious food, straight from the bourgeois kitchen. With her technical understanding of the cooking process, Julia Child ensured the success of every single recipe in her guide, if followed exactly. It was foolproof, essentially, and helped to restore confidence in the kitchen. As an aside, wouldn’t you have liked—no, **loved!**—to have known her? To have shared just one meal in her kitchen? Oh my goodness, every time I reread My Life in France, I picture being her friend. 

At any rate, I don’t know exactly when, but it seems like something was lost between the introduction of heavily processed, packaged foods and today. Madame Julia’s attempts were successful, for sure, and her recipe book is a tome of knowledge that so many of us enjoy reading and using, still. Nonetheless, that T.V. dinner business gave families a taste of quick and easy, and despite the mediocre flavor, we can probably all remember a favorite boxed dinner combo that our parents bought for us at the grocery store each week. 

Taking this idea of the lost art of cooking full circle, today’s recipe is meant to transport us back to the idea—or the memory, for some—of simple desserts presented around a table of friends and family. This particular pie is a new recipe for me, but I’ll definitely make it again. It is rich and creamy, and the perfect finish to a Sunday dinner or evening meal. I searched and tested several recipes that I found,  looking for something simple, smooth, and luxurious that also used traditional ingredients like buttermilk, cream, eggs, and butter. 

 Interestingly, the reason I began craving an egg custard, specifically, was a recent book I enjoyed by my very dear friend—and my daughter’s grandfather—Thomas Fowler. His book is Southside: Virginia’s Last Hope in the Civil War and it is a literary masterpiece. As I read it, I reveled in local history, feeling engaged with the characters through their hardships unimaginable. Despite the raging war, there remained a sense that life was simpler and that people appreciated what really mattered—God, family, fellowship, and sacrifice.  The book’s focus is, as the title suggests, the lives of those who lived in Southern Virginia during the Civil War. Having grown up there myself, I felt right at home reading the book, and I couldn’t help but to picture families sharing buttermilk, cornbread, biscuits, and classic pies. Egg custard seemed like the best pie choice as I finished the book. 

So, this recipe and today’s entry are dedicated to the history of friends and families breaking bread together in fellowship, to Julia Child’s grand kitchen revival, and, most importantly, to an outstanding author, mentor, grandfather, servant of Christ, and true friend to me, Thomas Fowler. I’m so glad he finally published one of his many outstanding stories.  Buy a copy of Southside soon, and buy one for a friend.  

Making this pie to enjoy while you read is pretty good idea, too, I’d say. 

Bon Appétit! 

Oh, and if you’d like to own a copy of Southside: Virginia’s Last Hope in the Civil War, check out this link http://www.amazon.com/Southside-Virginias-Last-Hope-Civil/dp/1493654470/ref=sr_1_2?ie=UTF8&qid=1426556248&sr=8-2&keywords=southside+fowler .

Buttermilk and Brown Sugar Custard Pie
Ingredients: 
  1. 9 inch deep dish crust (store bought or your favorite recipe)
1 cup dark brown sugar, packed
3 tbs. flour
3 large eggs
I large egg yolk
1 tsp. vanilla extract
1½ cups buttermilk
3 tbs. unsalted butter, melted and cooled


Directions: 
Position rack to center of oven and preheat to 400 degrees. Bake crust until pale golden, about 12 minutes. Transfer to rack and cool. Reduce oven heat to 350 degrees. 

Blend brown sugar and flour in processor. Add eggs, yolk and vanilla and process until blended. Add buttermilk and melted butter and process just to blend. Pour mixture into cooled crust.
Bake pie until filling puffs and is almost set but center still moves slightly when pan is shaken, about 45-55 minutes. Cool pie on rack to room temperature. Chill until cold, at least 2 hours and up to one day. 

Recipe from:


Friday, March 13, 2015

Butter Spritz Cookies

Day 93

My husband, Doug, has mentioned for years that he wanted not only to make, but to perfect his German grandmother’s butter cookies. He has mentioned them on a regular basis, always reminiscing about how he relished them as a child. Having no one still living in his family who has a copy of the recipe, he began searching various websites for the one that might be similar. Interestingly, most websites offer a basic butter dough for these cookies, which make sense because of their simplicity. 

On a recent snowy Sunday afternoon, he traded his photography vest for a chef’s hat and took over the kitchen. He settled on the recipe here, half of the batch made with a cookie press and the other half rolled by hand. These cookies were definitely worth repeating.
Photos by Maggie Kapustin
 
That being said, according to Doug, these cookies were not exactly the same as he remembers from his visits to Grandma’s house, so we will continue looking for a closer match. I’m okay with this almost perfect find, though, since it gives us a reason to keep baking and taste testing. Especially the tasting; that’s the part I like best. 

I’m including his near-win here because these little discs were simple and delicious. As I tasted one, warm from the oven, I realized that the buttery sweetness would lend itself perfectly to a weekend breakfast, served with fresh berry preserves this spring or summer. Doug disagrees, arguing that they are nice simply served with a hot beverage and no adornment. I prefer the added richness of jam, though, and I’m going to stick to my guns when I recommend these as sides to a French country breakfast in your house very soon. 


Butter Spritz Cookies
Ingredients:
 
3 cups all-purpose flour
1 cup confectioners’ sugar
2 sticks very cold butter, cut in cubes
½ tsp. salt
4 large egg yolks
1 tsp. vanilla

Directions: 
Place flour, sugar, butter, and salt in the bowl of a food processor; process until mixture is texture of coarse meal.

In a small bowl, lightly beat egg yolks and vanilla. With motor running, add to food processor. Process just until a dough forms.

Use a cookie press, pastry bag, or your hands to shape cookies into bite-sized pieces. Bake on ungreased cookie sheet at 350 degrees for 8-10 minutes, until cookie bottoms are lightly browned/tanned. 


Wednesday, March 11, 2015

Hash Brown Casserole

Day 92

Whenever I serve grilled chicken, pork, or steak, finding a suitable side that isn’t humdrum is a chore. The usual—baked, fried, or mashed potatoes—can be boring. Recently, I began experimenting with various hash brown casserole recipes to see which flavor combinations might work best with a hearty meat. I really liked the idea of a potato casserole as opposed to simple potatoes.

There were a few “musts”.  First, the casserole must be creamy but not mushy. Second, the casserole must be filled with at least one bold flavor so as not to be one of those filler-foods that we often see on restaurant buffets. And, lastly, the casserole must be quick and easy enough to make and serve for weeknight dinners.

Copyright, Doug Kapustin Photography, 2015
During the experimentation process, I tried potatoes that were shredded fresh vs. the bagged shredded potatoes found in the refrigerated or frozen breakfast section of the grocery store. Many recipes—some even from very reliable Food Network names like Paula Deen—called for the thawed, bagged potatoes.  The fresh potatoes were definitely better. The bagged potatoes worked and were good; although, I must admit that they were slightly mushy in comparison.  Consider them as an option if you’re in a hurry or if the idea of shredding your own potatoes would keep you from trying this recipe otherwise. 

Although I’m a die-hard fan of Yukon Gold potatoes for flavor, texture, and appearance, I recommend a classic Russet baking potato here. The more durable flesh is best for a casserole that bakes to a much softer consistency. I also recommend that you clean the potatoes well before shredding, but do not peel them. The skin adds texture as it bakes, for sure.

The ingredient list I eventually chose is basically the same as a loaded baked potato or a twice-baked potato, but there is definitely some wiggle room for you if you prefer different add-ins. Jalapeno and cilantro were two of my add-ins that I couldn’t resist. You will probably want to keep the main ingredients the same in order to have a creamy end result, however. 

This casserole pairs beautifully with steak more than the other meats, I’d say. I recommend serving it with a green salad (leaf lettuce, red onion, blue cheese crumbles, dried cranberries, and walnuts or pecans) tossed with a balsamic-honey vinaigrette (olive oil, balsamic vinegar, crushed garlic clove, salt, pepper, and honey to taste) to cut the richness of the meat and potatoes. 

 Hash Brown Casserole

Ingredients: 
2 lbs. russet potatoes, shredded, peel on
½  stick melted butter
2 cups sour cream
1 can cream of celery soup
1 large onion, diced
2 cloves garlic, minced 
2½ cups shredded sharp Cheddar cheese
1 cup shredded Pepper Jack cheese
15 slices bacon, fried until crisp, then crumbled
1 jalapeno, chopped finely, seeds removed
dash of Worcestershire sauce
½ cup chopped, fresh cilantro
salt and pepper to taste
1 can French fried onions (like French’s or Durkee brands)

Directions:
Heat oven to 350 degrees. Butter/grease a 9x13 baking dish. 

After frying bacon, use the bacon grease to sauté onion until slightly soft. Add garlic and jalapeno, and sauté for one more minute.  Turn onto paper towel to remove excess grease. 

Mix shredded potatoes (these can be shredded with the larger holes of a box grater or you could use a food processor if you have the grater attachment), sour cream, celery soup, diced onion/jalapeno/garlic, Cheddar cheese, bacon crumbles, Worcestershire, cilantro, and salt/pepper in a large mixing bowl until combined.

Pour into prepared baking dish and sprinkle with can of fried onions. Pour melted butter over top of onions and casserole. Sprinkle with Pepper Jack cheese, mostly covering onions.

Cover casserole with foil and bake for 45 minutes. Uncover and bake an additional 15-20 minutes, or until onions and cheese appear bubbly and slightly browned.  


Serve hot. 

Tuesday, March 10, 2015

No Fuss Clam Chowder

Day 91

It’s March, and I bet I can safely assume that we’re all ready for spring weather.  Food-wise, however, we still have a few more weeks to enjoy some rich chowders, soups, bisques, and stews. 

Let’s take advantage of the fleeting winter temps with today’s recipe! This clam chowder is definitely just what the doctor ordered for a delicious and easy dinner to celebrate winter’s end. 

No Fuss Clam Chowder
Ingredients: 
Photo by Maggie Kapustin

1 large onion, diced
3 tbs. butter
½ cup chopped pancetta
2 medium Yukon Gold potatoes, diced
2 medium red potatoes, diced 
3 cloves garlic, minced
1 stalk celery, chopped
3 cups chicken broth
1¼ cups heavy cream
1¼ cups half and half
3 (6.5 oz.) cans clams in clam juice (do not drain)
1 bag frozen sweet corn, thawed 
salt and pepper to taste
1 small bunch Italian parsley, finely chopped
Tabasco or favorite hot sauce

Directions:
In a Dutch oven, melt butter and cook pancetta and onions on medium heat until pancetta is browned and crisp and onions are translucent. Add garlic and continue cooking for one minute. 

Add celery and potatoes and sauté for 2-3 minutes. Reduce heat and simmer until potatoes are soft. Taste and add salt and pepper as desired. Stir in clams, corn, half and half, and heavy cream. On low heat, cook for about 15-20 minutes, adding more salt and pepper if needed. Add parsley and stir. 

Ladle in bowls and add a drop or two of hot sauce as desired. 


Delicious served with BLTs (pictured) or cheddar garlic drop biscuits. 

Saturday, March 7, 2015

Primavera Stuffed Shells

Day 90

This recipe is my twist on the more traditional stuffed shells that often include ricotta and ground beef with a savory tomato marinara. Sometimes, especially in colder weather, I want to serve my family a dish that’s more stick-to-the-ribs. I’ve taken this idea and paired it with some springtime flavors—grilled chicken, peppers, onions, garlic, and spinach—to create a comfort dish with a primavera edge. 

I served this two ways—the first night with garlic bread and a simple grape tomato-onion-cucumber salad. The leftovers, I served for lunch the next day. I decided to serve them on a bed of pesto sauce, just for a flavor change
Copyright, Doug Kapustin Photography, 2015
(pictured). If you like this idea, you could use a good quality store-bought pesto or you could make your own. There are so many good pesto recipes out there, so you decide which one you like. As you might have guessed, I like  Ina Garten’s and Ree Drummond’s best. Here are their links: 

By the way, that tomato salad I mentioned earlier is not pictured, but if you’re interested, here’s what I did: Take two cups grape tomatoes, sliced in half, one cucumber, sliced in thin wheels, and ½ of a sliced red onion, and set aside. In the bottom of a glass or wooden salad bowl, drop one large clove of crushed garlic, and some salt and pepper (start with just a little of each). Add one tbs. of red wine vinegar and mix together with a fork. Next, add one tsp. Dijon mustard, and stirl together. Finally, add ¼ cup olive oil and mix together. Add tomatoes, cucumber, and onion, then toss to coat. Taste, then add salt and pepper to your flavor preference. Maybe you’ll want a little more vinegar too—you decide.  Allow to rest, covered, in fridge for at least 1 hour. The flavors will blend beautifully and the acidity will cut the creaminess of the shells. 

These stuffed shells are decadent, and they are as easy as can be to prepare. Try them with your family before the weather warms too much! March is the perfect transition month for this dish—a little taste of primavera with a lot of creamy, comforting goodness. 

Primavera Stuffed Shells
Ingredients: 
1 (12 oz.) box jumbo stuffed shells, boiled until just before al dente, drained, and set aside
For the shell filling: 
3 cooked chicken breasts, chopped (grilled or roasted)
½ green pepper, chopped
½ red pepper, chopped
1 large sweet onion, chopped
2 cups finely chopped baby spinach, stems removed
4 cloves garlic, minced
olive oil, for the sauté pan
1 (16 oz.) container whole milk ricotta AND 1 (8 oz.) container whole milk ricotta (OR if your market has a 24 oz. container OR if you have another use for an extra 8 oz. container, buy it that way-- you decide)
8 oz. shredded Monterey Pepper Jack cheese 
8 oz. shredded Mozzarella cheese
1½ cups grated Parmesan-Asiago-Romano cheese blend
4 basil leaves, chopped
2 large eggs, slightly beaten
salt and pepper, to taste

For the sauce: 
2 cups heavy whipping cream
¼ cup butter
4 oz. cream cheese, cubed
1½ cups grated Parmesan cheese 
1 clove minced garlic
½ cup chopped Italian parsley
salt and white pepper, to taste 

tomato sauce or pesto for coating baking dish 

Directions: 
Spray a 9x13 pan with cooking spray, then coat the bottom with a VERY thin layer of tomato sauce or pesto. 

In a pan, sauté the onions and peppers with a bit of salt and pepper until tender. Add garlic, spinach, and chicken. Mix well. Set aside to cool. 

In a large mixing bowl, combine ricotta, eggs, and basil. Salt and pepper the mixture. Add Monterey Pepper Jack, Mozzarella, and Parmesan-Asiago-Romano cheeses. Mix thoroughly. Add chicken mixture and basil; stir to combine. 

Holding a shell in your clean hand, use a small spoon to scoop the filling into each shell. Add to the 9x13 pan to make one layer of shells, slightly pressed together for support. I over-fill the shells because I like the filling to spill out into the white sauce, but that’s up to you. With any additional filling, you can either spread it along the top of the shells or save it for another dish (like a baked spaghetti later in the week!). 

Once you have a pan of filled shells, make the sauce* and pour over the shells while the sauce is hot. Bake at 350 degrees for 30-40 minutes, until the mixture is hot and bubbly. 

*To make the sauce: 
Melt butter on medium-low heat in a saucepan. Add garlic. Cook for about 1 minute. Add heavy cream and stir until warm. Add cubed cream cheese and continue stirring until melted. Add Parmesan cheese, parsley, and salt and white pepper to taste. Stir until thick and well combined. If any accidental lumps appear when adding cheese, just use a whisk to break them.